
 |
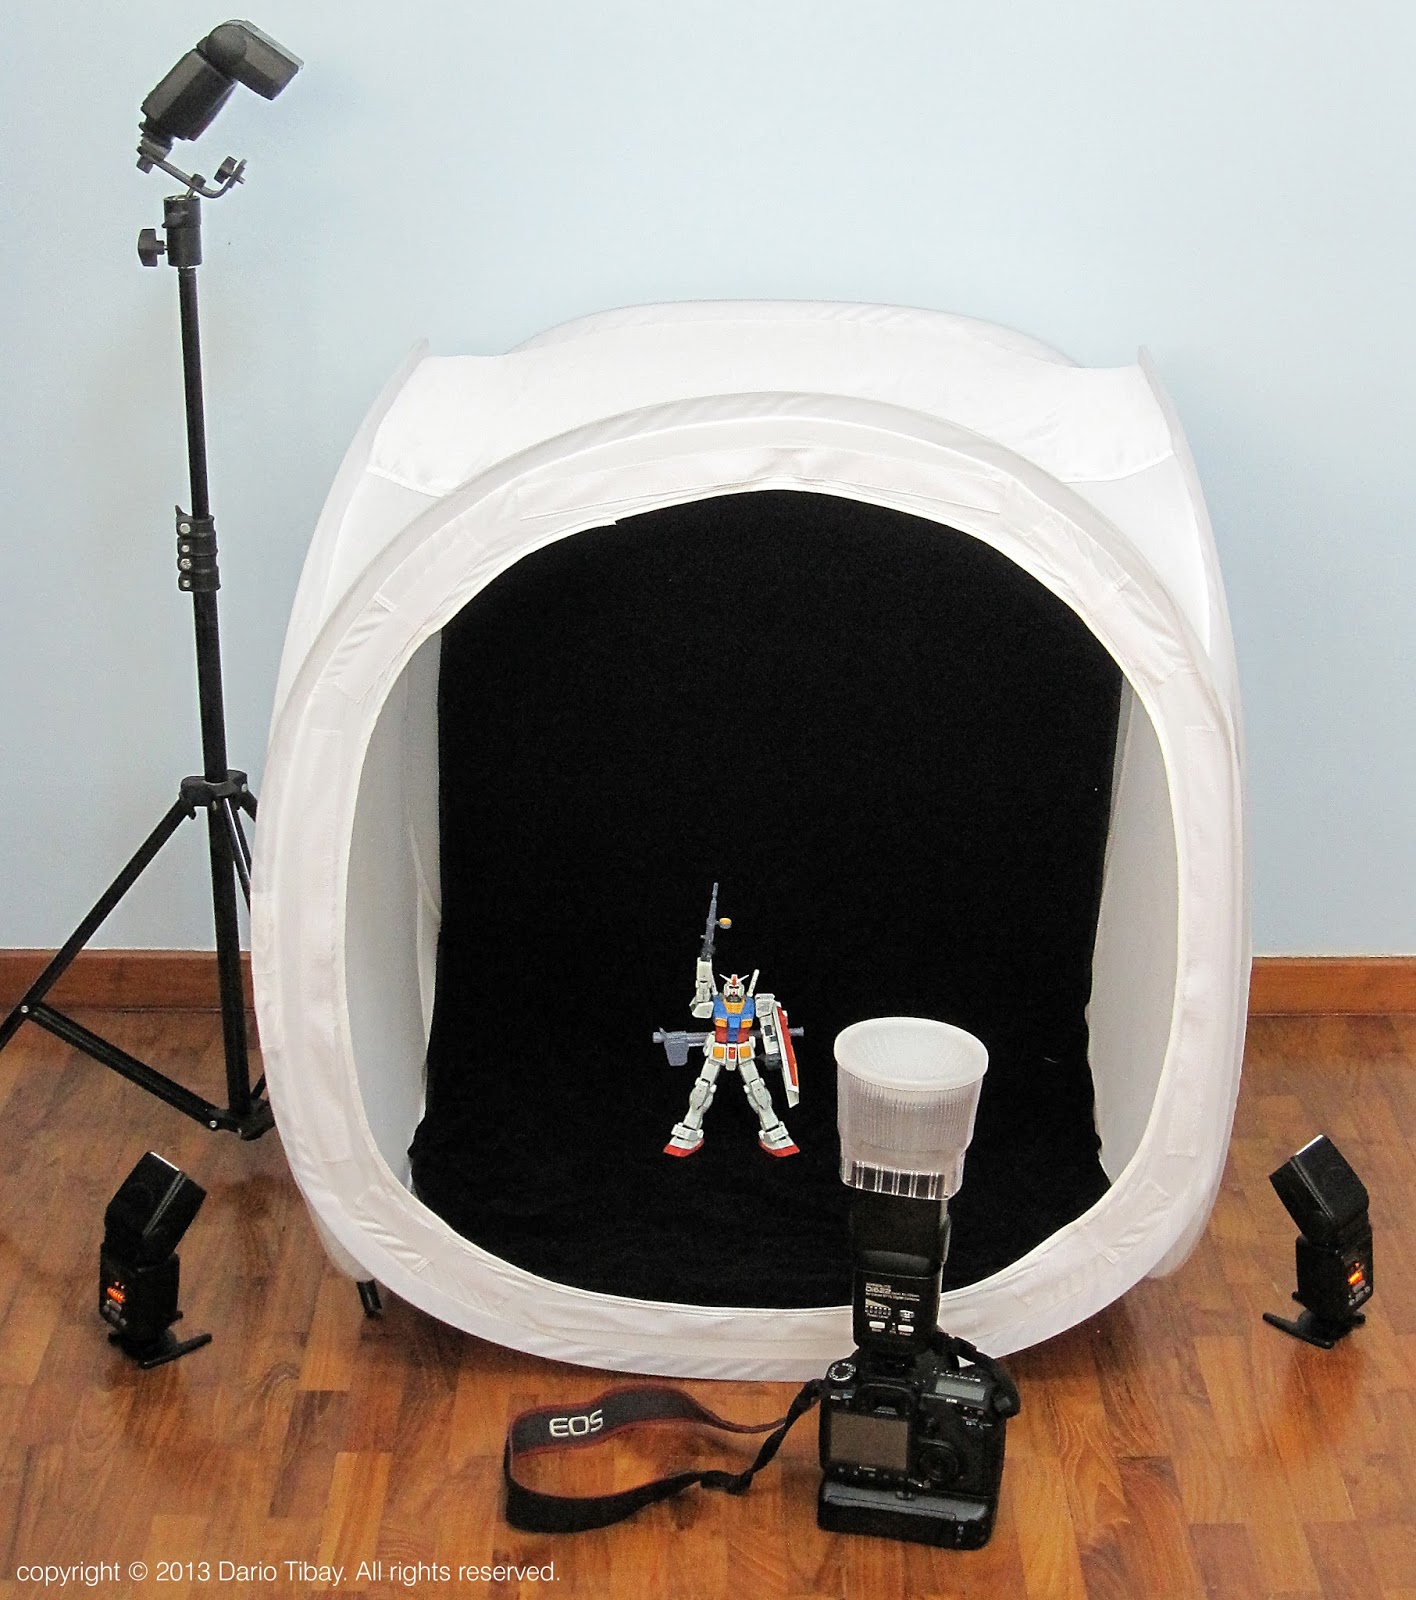
| I use an 80 cm x 80 cm x 80 cm light tent which came with differentcolour backgrounds (red, blue, black, white), three Yongnuo Speedlite YN 460 off-camera flash units in slave mode , one Nissin Di622 flash unit equipped with a Lightsphere flash diffuser mounted on my Canon EOS 40D with an EF 50mm f/1.8 II prime lens. |
Given my background as a visual artist and graphic designer, photography and travel are interests that come naturally. And ever since I was introduced to photography in secondary school, it has been an enduring passion ever since. And the logical progression now that I am into Gunpla and scale modelling is to take whatever I have learned in doing different kinds of photography and apply them to scale models and toys. Although what would be more applicable to scale models and toys would be the knowledge I've acquired doing product photography. Just in case you're interested to see my photography work, you may view them here and here.
The top photo is my set up when photographing my Gundams. I use an 80 cm x 80 cm x 80 cm light tent, three off-camera flashes in slave mode (click here for a How To on setting up camera slave flashes), one on-camera flash mounted on my DSLR (Digital Single Lens Reflex) camera equipped with a prime lens (typically I use a 50mm f/1.8 lens). This is the same setup I use when photographing products. I won't go into the details since this is more of a scale modelling blog than a photography blog. Just to briefly explain the use of the light tent, it basically "diffuses" whatever light source you're using, in my case, the three off-camera flashes. Without it, you would get really harsh shadows, creating a hard contrast between light and dark areas. Even with just the light tent, lots of sunlight, and even just a regular camera, you could set it up in your backyard or balcony or any place in your home and you would be able to achieve pretty much the same effect. I usually shoot using a very small aperture setting to bring out maximum details. Since you're photographing miniatures, using larger aperture settings would result in selective focus. Anything in front or behind the area that you chose to focus on would be blurred. Read more about aperture here. Below are some sample shots using this set up.


UPDATE:
Quite understandably, not everybody would want or be interested to get a DSLR so I'm sharing here my "budget" setup. The things you'd need here are stuff you may already have lying around in your house. 1) A large piece of cardboard, it doesn't necessarily have to be white, could be any colour (box board, the one with one side that is white and the other side that is rough and gray; or bristol board would do nicely), 2) Another piece of stiff board with at least one side that is clean and white (an illustration board would be nice), 3) Some masking or any tape, 4) A regular desk lamp fitted with a white fluorescent bulb (those energy-saving sort), 5) Any old point-and-shoot camera or camera phone that you already have.

Now here's what you do: 1) As with the photo above, tape the lower edge of the larger, more flexible board on your desk or table top then tape the top edge to the wall or whatever's behind it to create a seamless sloping backdrop. 2) Place the stiffer board on the side vertically (depending on where your desk lamp is situated, place this board on the direct opposite). This board will act as a reflector of sorts for your main light source which in this case is the desk lamp. 3) Place your model onto the seamless backdrop and pose as you please. 4) Direct your desk lamp to your model. Typically, I place the light at 7 or 8 o'clock of the model at an approximately 45 degree angle. Of course you're free to experiment on the light placement depending in the effect you'd like to achieve. 5) Shoot, shoot, shoot. Here's a couple of shots from this setup:
 |
| Completed HG 1/144 GF13-017NJII G Gundam |
 |
| Completed HG 1/144 GF13-017NJII G Gundam |
This setup is great for shooting in a room with little light or at night. But if you have a room with big windows and lots of light coming in, that would make things a bit simpler.

Instead of having a board on the side opposite your main light as a reflector, just use the light from your window to soften the shadows that your main light source is creating. Point-and-shoot cameras are typically equipped with wide-angle lenses. You would have to get the camera up close to your model to fit it inside the frame and that usually messes up the proportions of your model, whatever parts are closer to the lens tend to get exaggeratedly big and vice-versa. You can read more about wide-angle lenses and distortion here. To overcome this, I shoot at maximum OPTICAL zoom (or whatever suits to fit the model within the viewfinder frame) in order to minimize distortions.The digital zoom function in cameras or camera phones only magnifies the area within what you're viewing on the frame or screen. Essentially, it's just "cropping" out your image. I used an old Canon Digital Ixus 870 IS (also known as the PowerShot SD880 IS Digital ELPH in North America) with a 10-megapixel sensor. Here are a couple of sample shots:
 |
| Shot with the default wide-angle, no zoom Snap-built MG RX-78-2 Gundam Ver. One Year War 0079 |
 |
| Shot at maximum optical zoom Snap-built MG RX-78-2 Gundam Ver. One Year War 0079 |
As you can see with the wide-angle shot, the head and upper torso look noticeably much bigger and the feet look much smaller. The one shot at maximum optical zoom have much better proportions (at least visually). But of course it's all a matter of preference, if you like the effect, then by all means shoot at that setting to your heart's content. Happy shooting!
Thanks for viewing.
No comments:
Post a Comment