I would suppose that it is pure coincidence that I decide to finally paint this kit just when the mothership (Bandai) decided to come up with yet another
Master Grade (MG) version of this suit, the
Wing Gundam Proto Zero (Endless Waltz version). I have had this kit for quite some time now (give or take a year or two) and I've only been keeping it in storage after snap building it. I figured a 1/60 scale kit would be an ideal test subject for my next foray into Gundam kit painting. Maybe soon, if funds (and the wife) permit, I could get my very first
Perfect Grade (PG, they're also 1/60 scale but have waaaay more detail and gimmicks). Anyway, I did try to document as much as I can of this (currently) work-in-progress. I will post an update when I've completed this project.
The
XXXG-00W0 Wing Gundam 0 is a transformable mobile suit, it can change into a high-speed flight mode otherwise known as "Neo-Bird Mode." Here are some shots of the snapbuild:


It's a bit on the "stocky" side, not as "sexy-looking" as the
Wing Gundam Zero Custom but I think the proportions are just right. It's a bit top-heavy especially if you have the batteries for the LED installed but the leg joints seem tight enough to keep it upright. Even the arm joints are good enough to support the weight of the really big Twin Buster Rifle. The kit is quite detailed and have a lot of panel lines to signify sections of armour and hatches and access panels, all of which add to the realism. Unlike a
Perfect Grade kit though, whole sections are moulded together, so to paint sections that are of a different colour you would need to do a lot of masking as you will see from the photos below. It also looks pretty awesome in Neo-Bird Mode.
Now it's time to take all of this apart and have it ready for priming.
 |
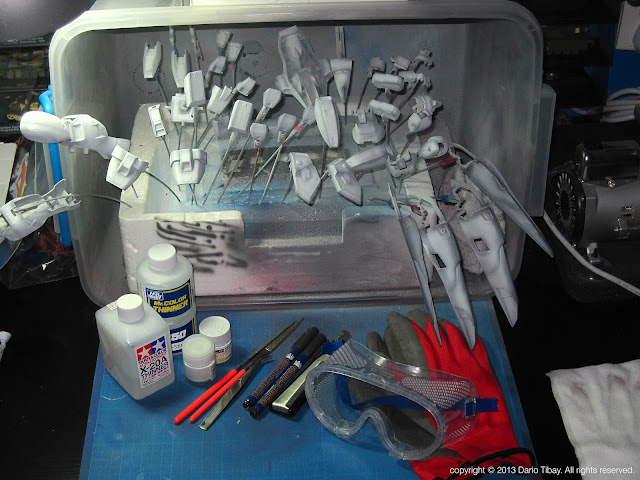
| Prime time! I've organised and grouped the parts which are similar in colour together and put them on individual airbrush clips (wire pegs with metal alligator clips on the end to hold up model parts). This would allow me to paint in batches and save up on precious paint. This would also minimize the frequency of cleaning the airbrush since I could do it in between colour changes. |
 |
| I used the light gray Tamiya Fine Surface Primer L for this kit. On initial spraying, it may seem to lay on thick but as it dries, it spreads over the surface of the the plastic quite evenly and all the panel lines come out nicely. |
 |
| I didn't really follow the recommended colour scheme on the instruction manual. I figured I'd just "Wing" it, if you'd pardon the pun. Hahaha. I used Tamiya Acrylic X-10 Gun Metal for the waist section, the shoulder vulcan cannons, wing connectors, elbow joints, backpack, and the hands. |
 |
| And here they are, all neatly laid out. |
 |
| Close up of the hands. |
 |
| Now I've masked off the painted elbow joints and cemented the upper arm and fore arm parts together and sanded the seams. Afterwards, I gouged some of the panel lines which have diminished due to sanding with a Tamiya Plastic Scriber tool. |
 |
| I first sprayed the verniers and the gun turrets for the wings and shield with Mr. Color C8 Metallic Silver then I finished off the outer rims with Tamiya Acrylic X-10 Gun Metal to simulate exhaust and flash burn. |
 |
| Here's the assembled backpack. |
 |
| The silver and gun metal parts of the Twin Buster Rifle done. It now needs some serious masking for the gold parts. |
 |
| Now for some pre-shading action for the white, red, and blue parts. I used Tamiya Acrylic XF-24 Dark Gray for pre-shading. I felt black might be too harsh but it's all a matter of preference really. |
 |
| Test-fitting the painted parts together. |
 |
| Holding up the Twin Buster Rifle quite nicely. |
 |
| Ready, aim, shoot! |
 |
| White parts finished. Now it's time for masking... |
 |
| ... And more masking! |
 |
| I felt that the red LED that came with this kit was pathetic... |
 |
| ... So I got a couple of bright white LEDs to replace it, a 5mm for the chest and a 3mm for the head. |
 |
| Cutting out the eye sticker. |
 |
| Now that's what I call a light! I may need to mask out the area around the eyes so it won't leak out. As of this writing, I've acquired a soldering iron so I may properly attach the wires to the LED terminals but I have yet to do that. Will post the complete lighted kit on an update. |
Presenting, the completed 1/60 Wing Gundam 0 kit!


Thanks for viewing!


No comments:
Post a Comment